1. Knowledge Base
  2. Windows Logon Manager (WLM)

How to deploy SurePassID Windows Login Manager (WLM) via script or Windows Active Directory Group Policy Object (GPO)

The following is information about how to deploy SurePassID Windows Logon Manager (WLM) product as a Windows Logon provider and optionally to filter our other providers, presenting only our WLM (enforcement).


Prepping a test machine to thoroughly test the SurePassID WLM setup before deployment

We highly recommend setting up a test machine, putting in the latest WLM DLL after running the installer, then using the config tool to set up the settings for your SurePassID MFA Server tenant, then test the system to be sure it works as needed.
Once that is done you can take the registry files from "stage", "production", and a copy of the  HKEY_LOCAL_MACHINE\SOFTWARE\SurePassId\CredProv (CREDPROV) section exported to a "settings.REG" file, along with the latest WLM DLL, place those on the target machines and import the registry items. You can do this via a simple batch file or other scripting system.
 

Standard install using our WLM Installer and the configuration tool

When you use the WLM installer to do an initial install, you will see 4 folders under this path on the machine:

C:\Program Files\SurePassID Corp\SurePassID Windows Logon MFA\Deployment Packages\Support Files

See screenshot below: 

The "Stage" folder contains a copy of the WLM DLL (ignore this if you will be using the WLM patch to update the DLL) and a "RegisterSurePassIDWithWindows.REG" file that can be imported to set up our WLM as a login provider. There are 3 items that are added into a Windows computer that makes us available as a Windows Login Provider:
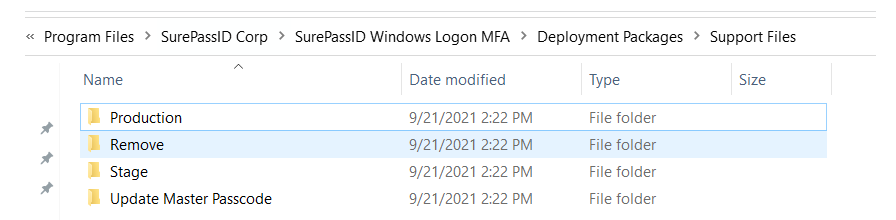
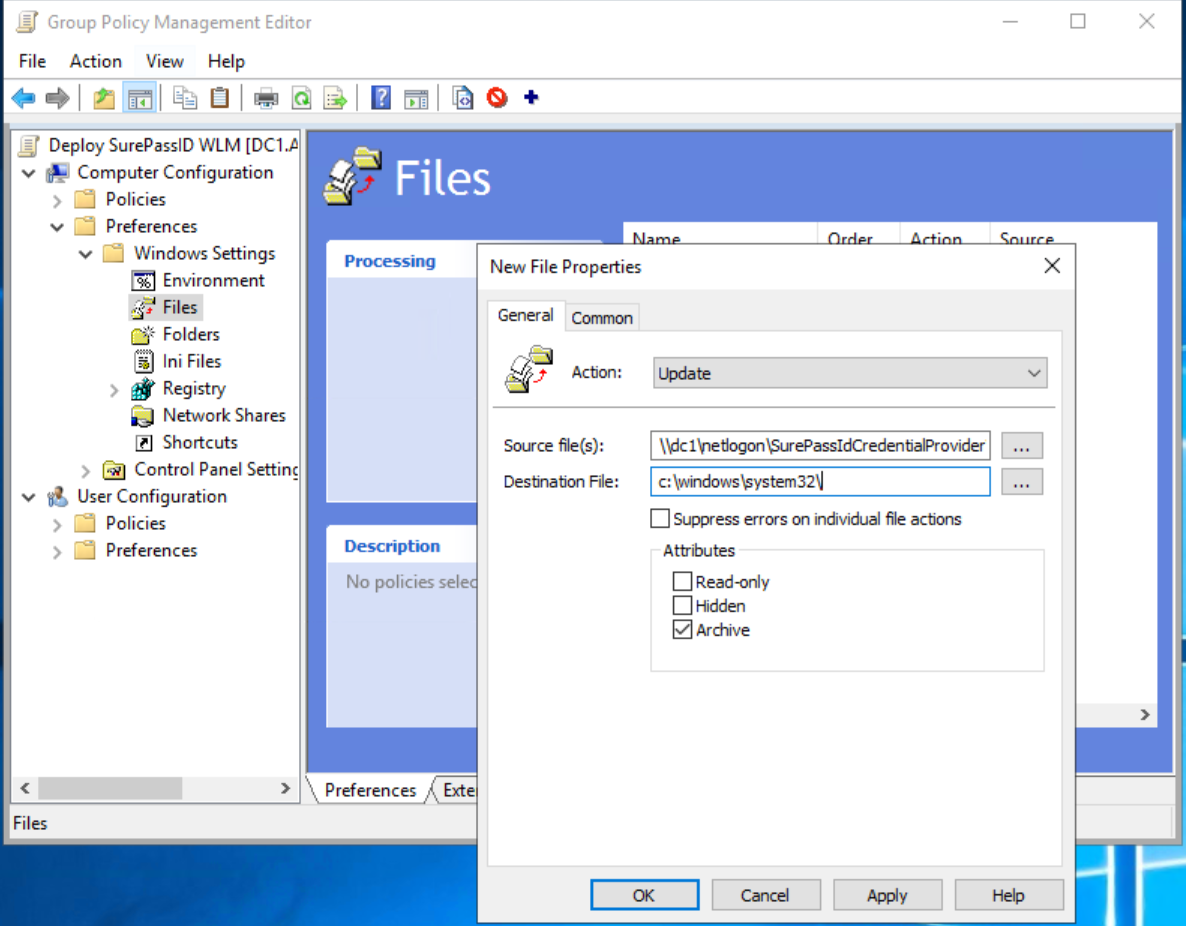
  1. The most current WLM DLL placed into c:\windows\system32.

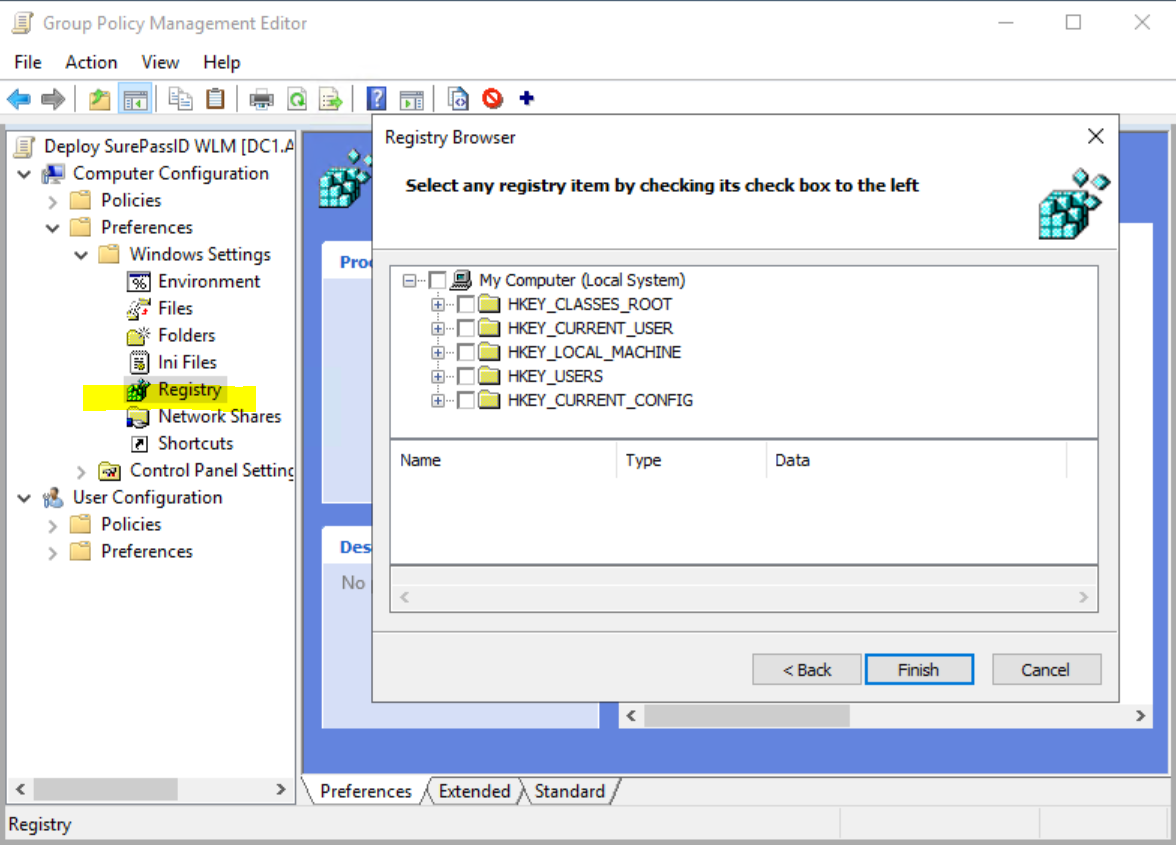
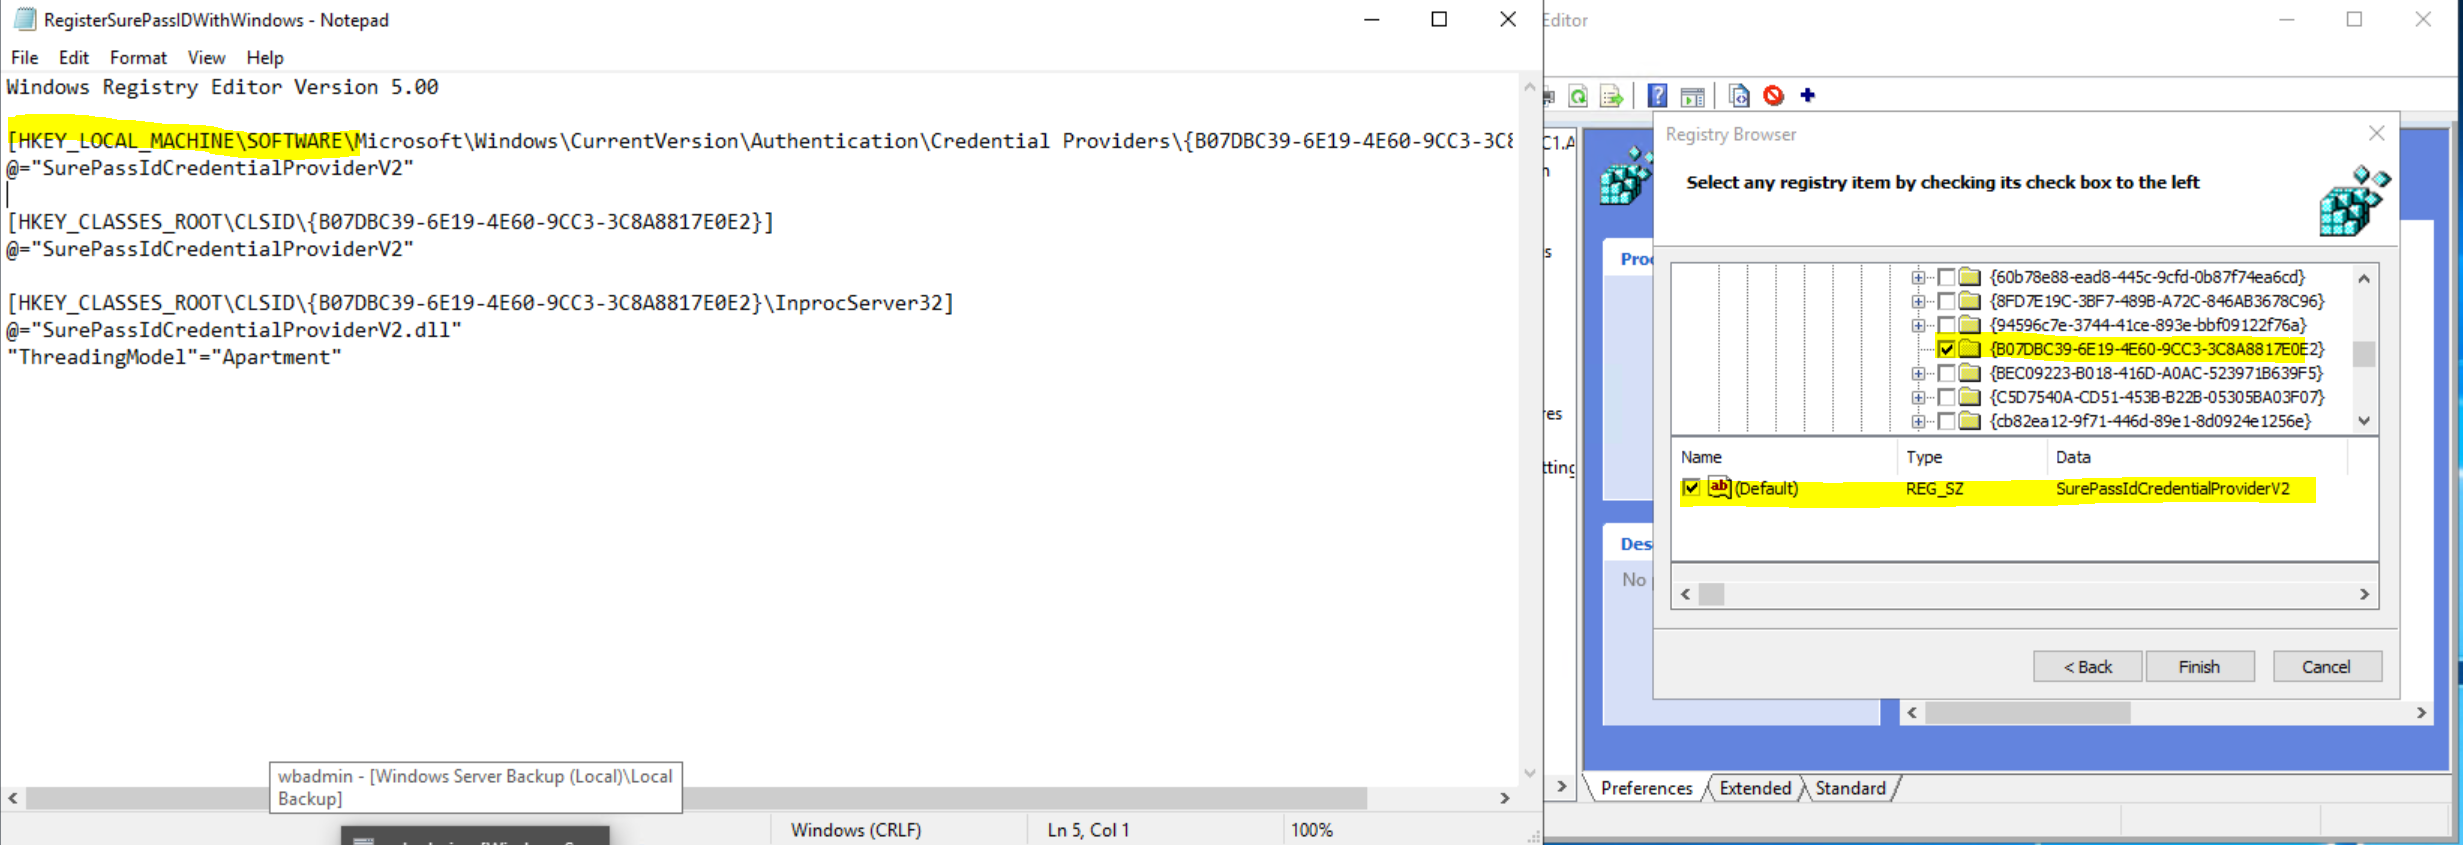
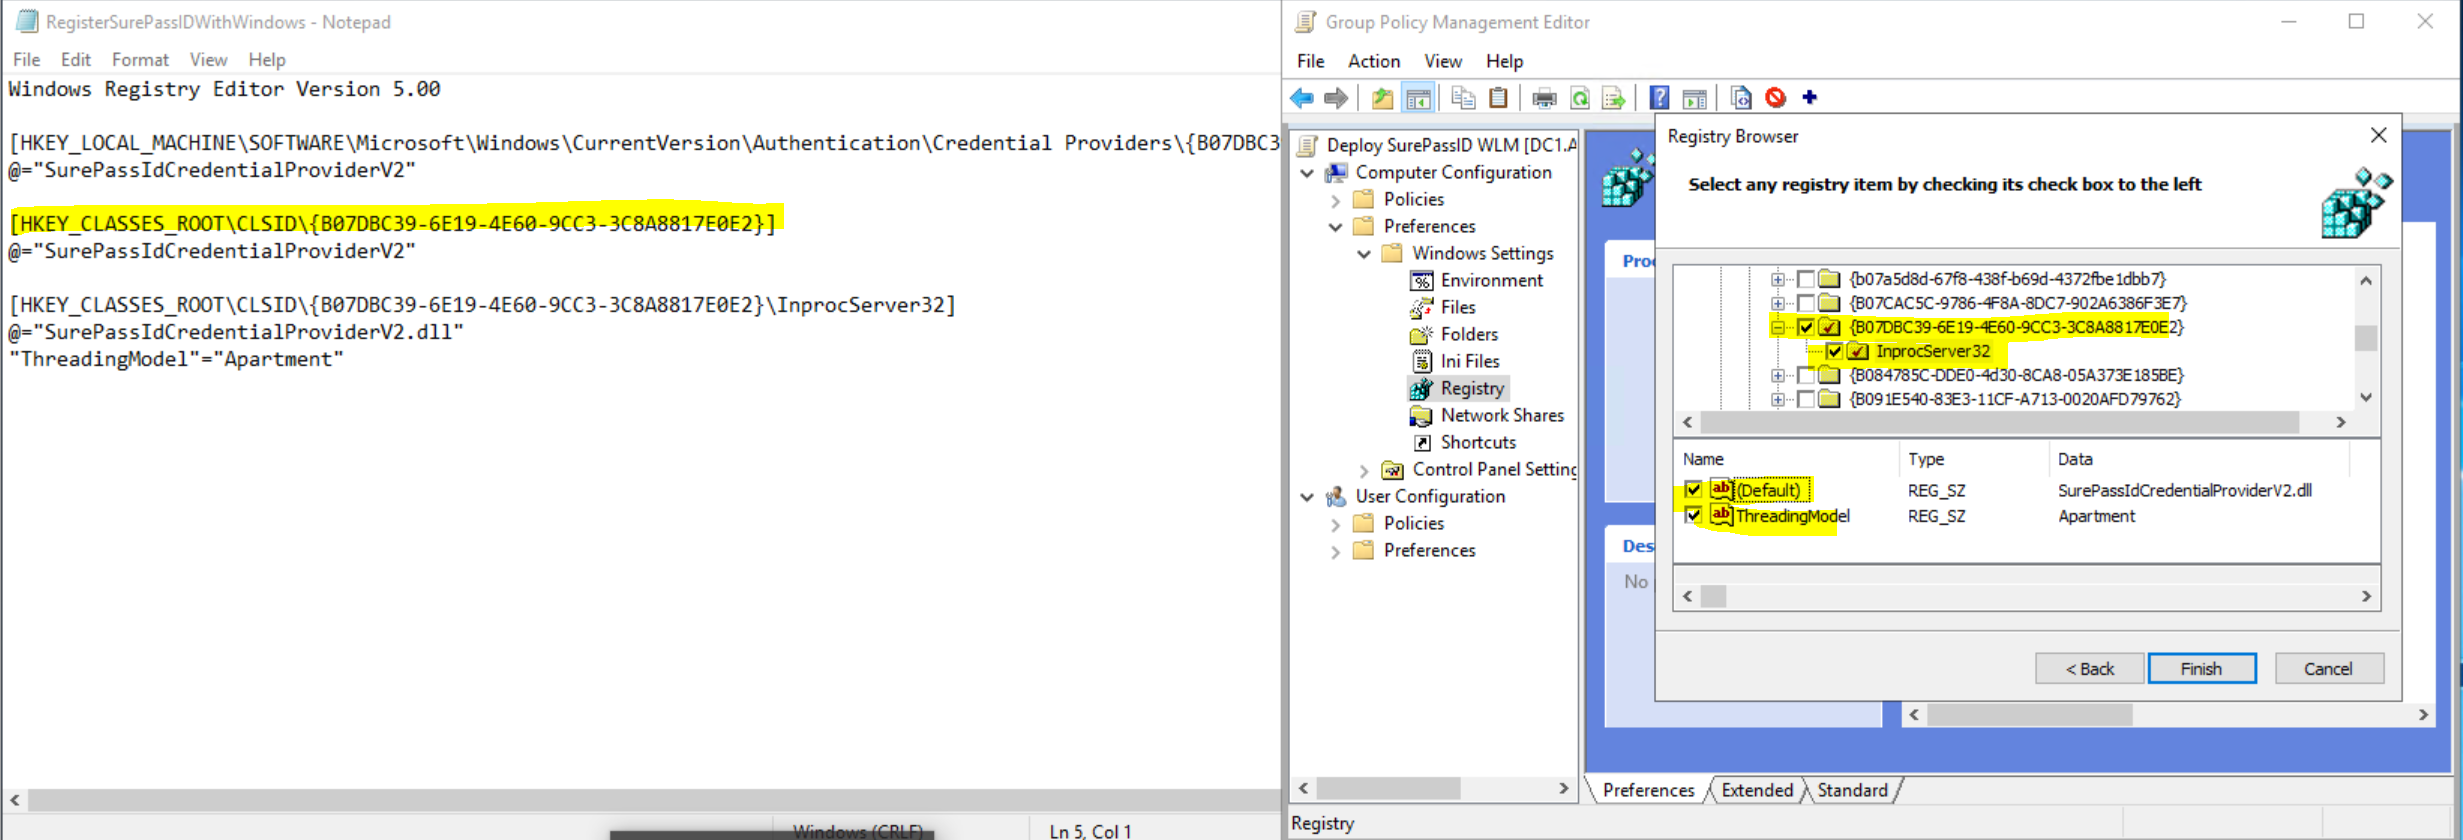
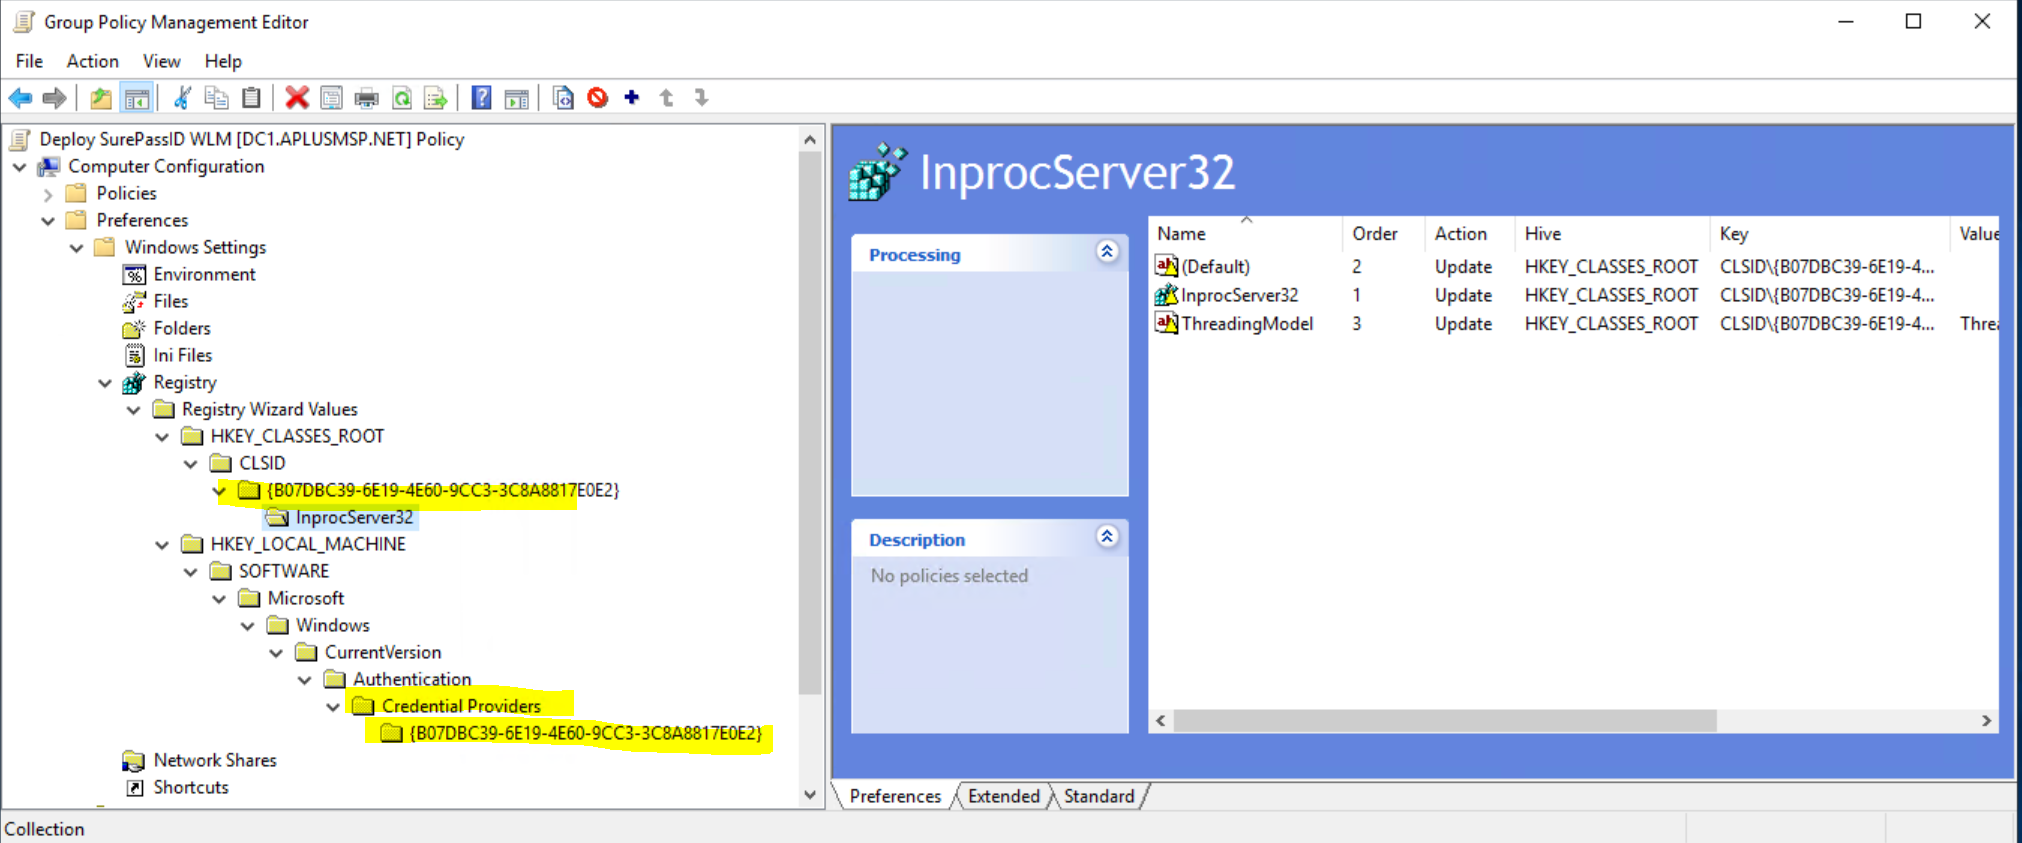
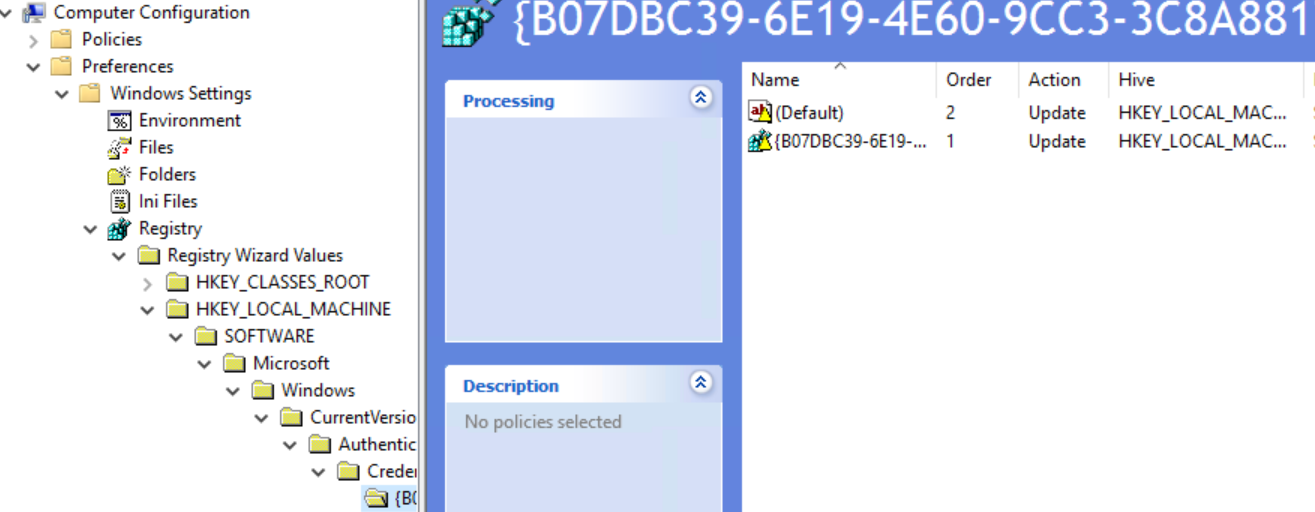
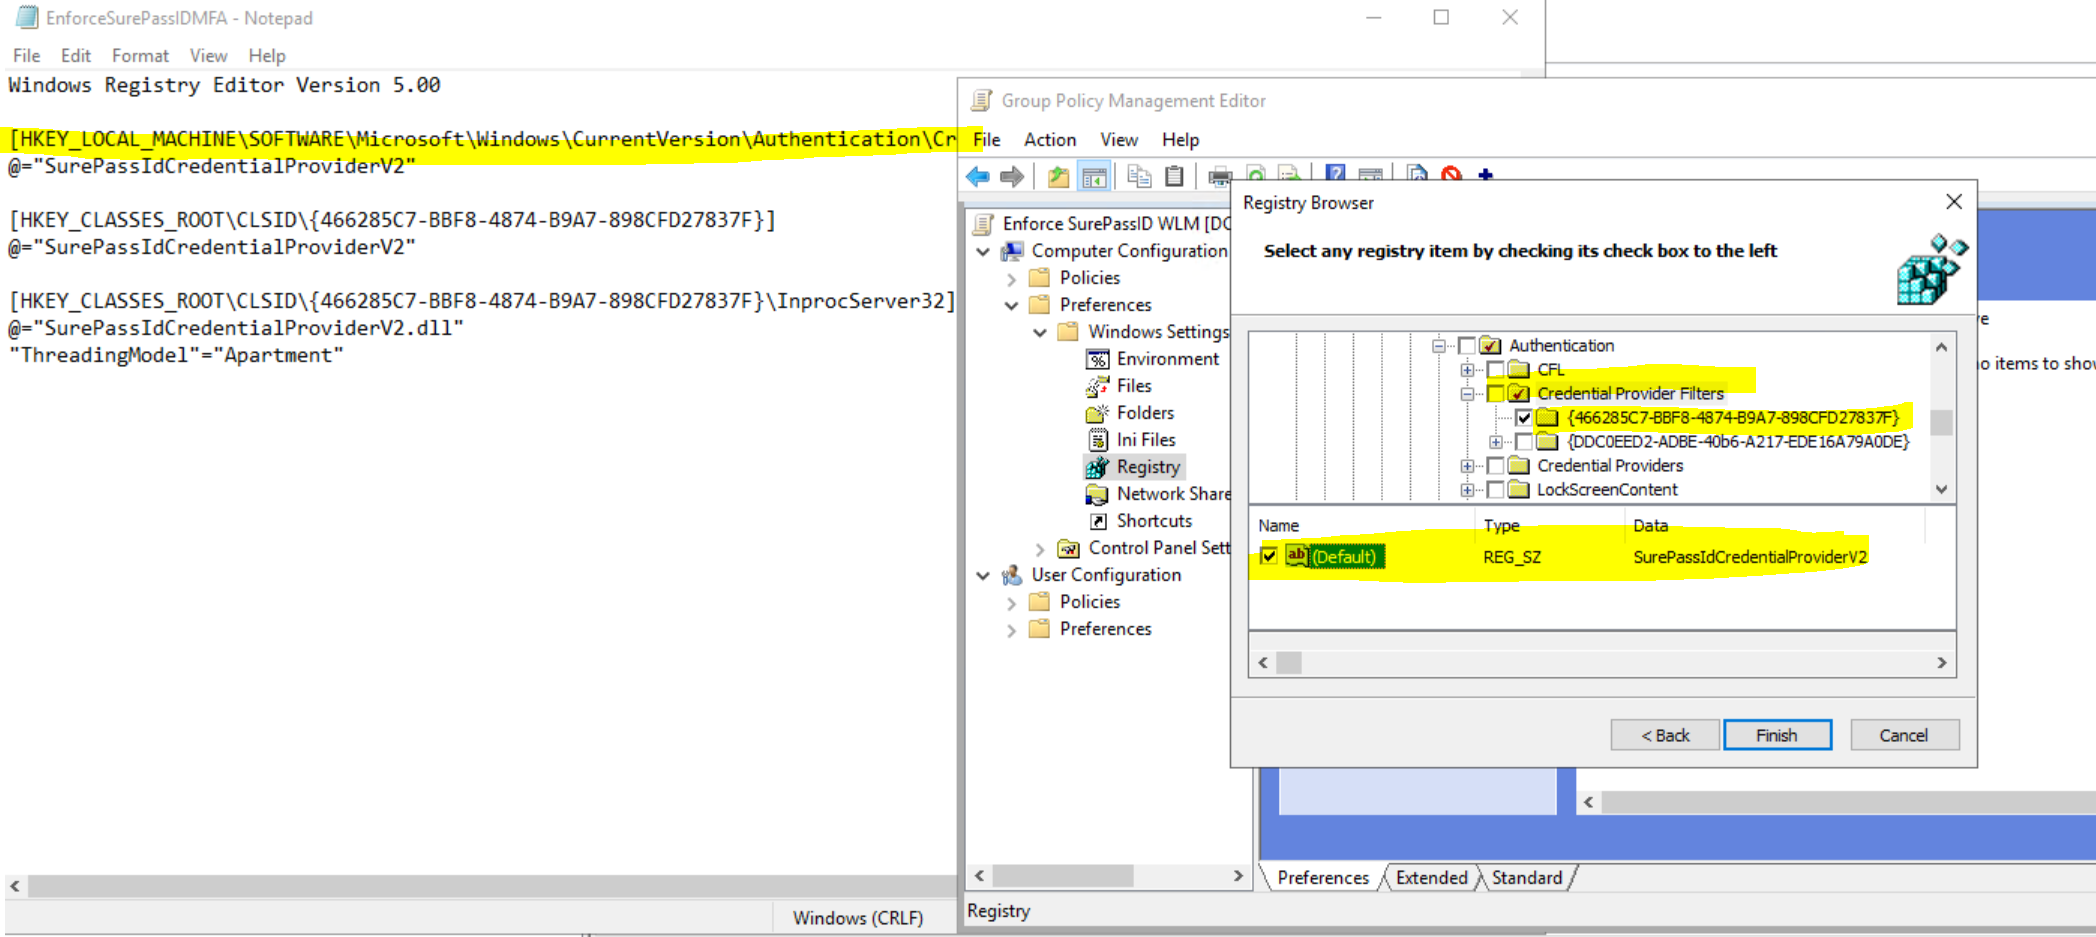
  2. The registry items from the "Stage" folder's "RegisterSurePassIDWithWindows.REG" file.

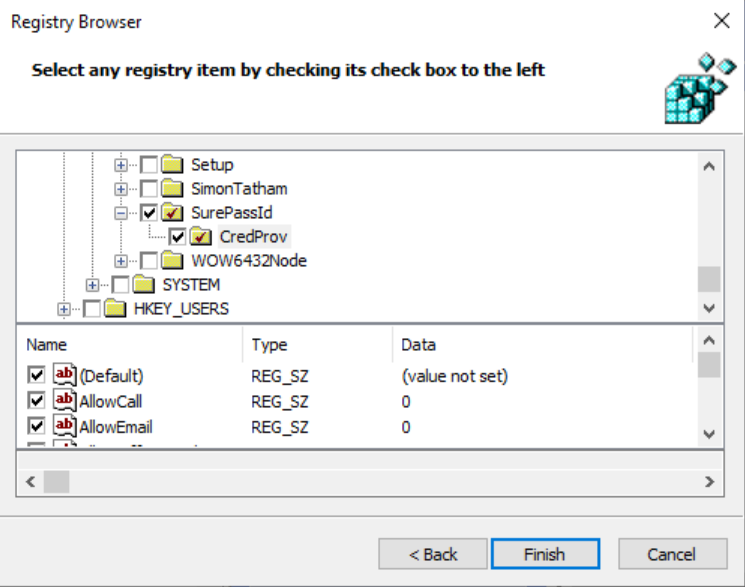
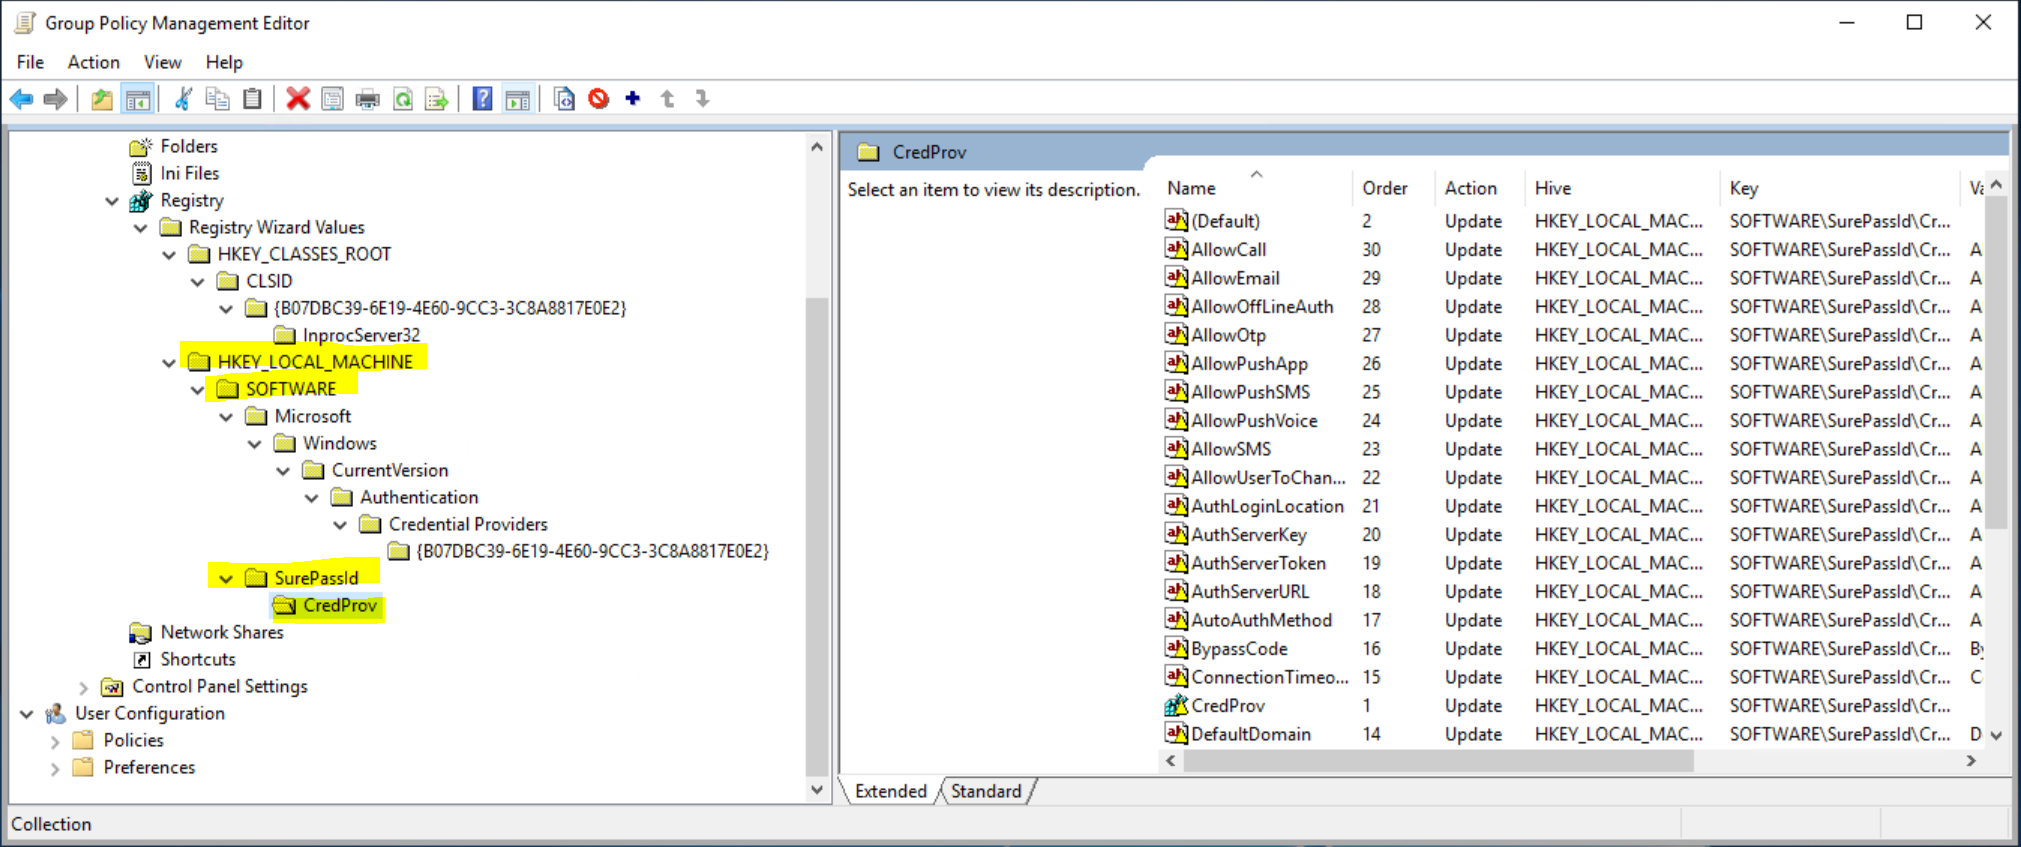
  3. The registry items from the HKEY_LOCAL_MACHINE\SOFTWARE\SurePassId\CredProv (CREDPROV) section, which can be exported to a "settings.REG" file for import into other computers. (This is created initially by our installer and can be managed with the SurePassID configuration tool included in the installer.)

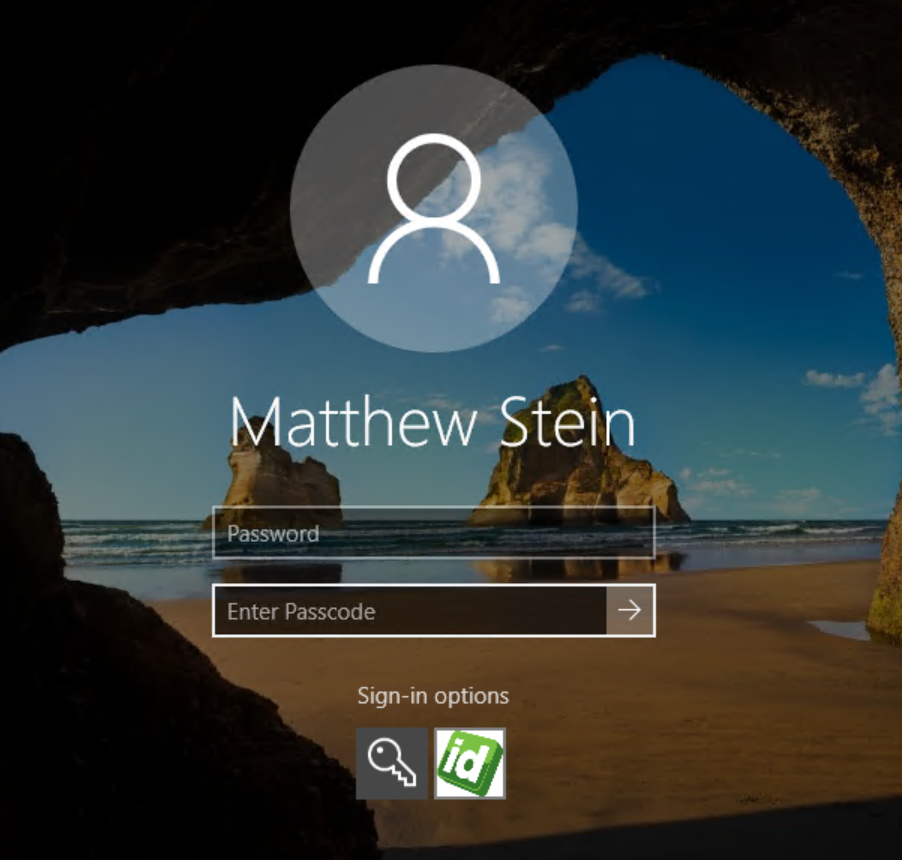
Once the above items are in place our WLM can be used to authenticate.

Enforcement

The "Production" folder has the needed credential provider filter registry settings to mask the other providers, presenting only the SurePassID WLM at the login screen.   The file that can be imported is called " EnforceSurePassIDMFA.REG".   Occasionally we see additional providers showing up that don't get masked, but that is not very common, and that can be addressed by disabling the other providers in the registry as needed.

WARNING: Do not use the enforcement option until the system has been thoroughly tested. We also recommend maintaining the ability to remotely access the registry of the machine to be able to remove the filter settings should the system not allow authentication for any reason. Lastly, the use of a bypass code should be considered, at least for initial deployment, to be sure you have the ability to authenticate if there is an issue.


Removal

The "Remove" folder has a "Remove.REG" file that removes the settings and turns the SurePassID WLM off. It does not remove the WLM DLL which will not affect the system since the registry settings making use of the DLL are removed. You can also use the add/remove programs option in Windows if our installer was used to install the SurePassID WLM on the computer.


Update Master Bypass Code

 
WARNING: The Update Master Passcode folder has a REG file used to put in place a new master code if you want to use one for an override. You would create a new code using our configuration tool that comes with the install kit, then export that particular item from the CREDPROV section, or just copy the text from a working machine into the provided REG file in place of the shaxxxx code showing the in sample .REG file. This simple REG file can be used to set a master passcode override on systems if desired. As long as the value is in place and valid the code can be used to override the OTP prompt in our WLM. Use appropriately.


Deployment via batch or other script mechanism

As noted previously, you can deploy our WLM by copying the latest SurePassID WLM DLL into c:\windows\system32, importing the  RegisterSurePassIDWithWindows.REG file to set us up as a provider and importing the needed CREDPROV settings from a working system. This can be done with a simple batch file or other scripting mechanism. As along as the system can reach a source for the DLL and REG files to copy them on the the target machine, this is a viable and simple method to use. 
The process would be something like this (batch used as an example):
 
@Echo off
REM Note this should be in a startup script so it runs before a user logs in.
REM Note also that the \\domain\netlogon path is accessible to domain computers before a user logs in so it can be a good source for the copying of the DLL file and/or needed registry files.
REM This example assumes the use of the domain netlogon path for the storage of the files needed for deployment.
REM Change the {DOMAIN.NAME} value to the name if your AD domain.
Set DOMAIN_NAME={DOMAIN.NAME}
c:
cd \
md c:\surepasstmp
cd c:\surepasstmp
xcopy \\%DOMAIN_NAME%\netlogon\SurePassIdCredentialProviderV2.dll c:\windows\system32\ /y /c
xcopy \\%DOMAIN_NAME%\netlogon\RegisterSurePassIDWithWindows.REG c:\surepasstmp\ /y /c
xcopy \\%DOMAIN_NAME%\netlogon\Settings.REG c:\surepasstmp\ /y /c
xcopy \\%DOMAIN_NAME%\netlogon\EnforceSurePassIDMFA.REG c:\surepasstmp\ /y /c
reg import c:\surepasstmp\RegisterSurePassIDWithWindows.REG
reg import c:\surepasstmp\Settings.REG
REM the following is optional if enforcement is desired
reg import c:\surepasstmp\EnforceSurePassIDMFA.REG
c:
cd \
del /q c:\surepasstmp\RegisterSurePassIDWithWindows.REG
del /q c:\surepasstmp\Settings.REG
del /q c:\surepasstmp\EnforceSurePassIDMFA.REG
rmdir /s /q c:\surepasstmp
 
Using the above in a script should result in a functioning SurePassID WLM deployment.  As always, test thoroughly on non-production systems first.
 

Deploy using a Group Policy Object (GPO)

We recommend using an Active Directory Group Policy Object (GPO) to deploy the SurePassID WLM in a domain environment. It is  recommended that 2 GPOs be used, one to place the DLL and import the registration (stage) and "settings" registry entries, but not the "Production" (filter) until you have fully tested. If you are using the GPO's Windows Preferences option to set the registry settings, then you can skip copying the .reg files to the targets and just do all the work with the GPO. 
For this example, we used a machine that had our SurePassID WLM installed and configured as desired and then used the Registry Wizard function in the Group Policy Management Tool. The GPMT  much be present on the machine used to create the policy and either have the SurePassID related registry settings already established in its own registry or be able to reach the registry of a system configured with the WLM if you will be using the Registry Wizard.  The user must be logged in with an account with sufficient permissions to create a group policy object, usually a domain admin.   You can optionally create the entries manually but it is quite a bit easier to use the Registry Wizard to import the needed settings directly from the registry.

WARNING: We do not recommend using a DC for this purpose but rather a Windows 10 or 11 system that has been thoroughly tested with the correct SP related settings and on which the GPMT console has been installed.  We recommend using a VM that can be snapped and restored as needed during this phase, a machine that is not a production system.

Here is an example of the items in a GPO that need to be populated. Note that the the .DLL file needs to be in a place that that the PC can reach to copy down the file i.e. the domain's netlogon share:
 
 
The above copies the SurePassID WLM DLL into c:\windows\system32.
 
The following examples shows the creation of the registry settings for staging our WLM as a provider: (Drill into the path shown on the left in the second screen capture.)


Drill into the HKCR path:
 
The result should be like the items shown below:
 
 
Drill into the HKLM\SoftwareSurePassID\Credprov section and check all the checkboxes:
 
 
All the checkboxes checked in the CREDPROV section:
 
With the above file and registry settings correctly set up in a GPO, you can then apply the GPO to an OU containing your test computer(s) and restart the test computers to verify that the SurePassID WLM is available as a login provider, usually by choosing "sign-in options" and then picking the "ID" icon representing the SurePassID WLM:
 
 
Once fully tested you can apply a second GPO that implements the filter.  That way you can easily disable the filters should something not be working right and you need to log in with Single Factor Authentication (SFA) until you resolve the issue.  This is an example of the registry settings for enforcement using the Credential Provider Filters section: